MLOps for Conversational AI with Rasa, DVC, and CML (Part III)
Categories:
NOTE: I’ve been a bit slow at getting this blog post published, hence there have been a few changes since it was written. Most notably, this post relates to version 2 of Rasa, which has been superseded by version 3. There’s also some new functionality in CML that can replicate some of what I do here, so it’s worth looking at the official documentation.
This is the third post in a series of blog posts about how to use Data Version Control (DVC) and Continuous Machine Learning (CML) together with the chatbot framework Rasa. In the previous post we set up a DVC pipeline to train and test a Rasa model. We also connected a remote cache on Amazon Web Services’ (AWS) Simple Storage Service (S3), allowing us to collaborate with others.
In this post we’ll add another piece of the MLOPs puzzle, which is to automate the running of our pipelines using CML and GItHub runners. If you want to follow along, you can read the first two blog posts (1, 2) and follow along with the code examples, or simply clone the GitHub repo.
What is CML again?
CML, as the name suggests, allows us to run machine learning models as part of our CI/CD pipeline. In the case of working with Rasa, this is super useful because we are continually training new models as new data is collected, or as we make changes to the model hyperparameters.
Without CML, we rely on every NLP engineer to run dvc repro after making any changes, and then committing the changes to both GitHub and DVC with git push and dvc push. Actually we can sync these two commands together by installing a DVC Git hook with dvc install.
Suffice to say, if we could ensure that a model was run when a significant code change is pushed to GitHub, the model stored, and the results reported in the pull request, well that would be very useful. CML + DVC does this for us 💥.
The CML GitHub action
Iterative.ai, the people behind DVC and CML, provide a number of examples of GitHub workflow yamls in the CML GitHub repo. We just need to add two additional stages to one of the default workflows to get our pipeline running like we want it.
If you’ve not worked with GitHub actions before, all you need to know is that this is GitHub’s CI/CD service, that can be configured with yaml files stored in ./github/workflows/. You can find our one in the blog GitHub repo, which I reproduce below:

Let’s walk through the various parts of the action.
Provisioning
The first few lines of the action config provision define when the job should be launched. You can read more about the events that can be used to trigger jobs in the GitHub documentation. In this case we choose push but there are more complex scenarios where we might only want to execute the job when a pull request is created, or on a particular branch. This can all be specified here. We also choose workflow_dispatch. This allows us to manually execute workflows using the GitHub Command Line Interface (CLI) tool gh or from the GitHub website.
Next we specify the environment we want to provision — in this case the latest version of ubuntu. Note that in other circumstances we may wish to use CML to provision an instance from a cloud provider (e.g. AWS), for example if we need access to a GPU for training. That’s out of the scope of this blog, but the CML website has examples of how to do this.

Checkout
Next we checkout the GitHub repo onto our instance using one of GitHub’s inbuilt actions: checkout. We also specify that we want to checkout the HEAD commit of the pull request from where the job was launched (we assume here it is launched from a PR).

Set up Python
Next we set up Python, again using another inbuilt GitHub action. Here we specify the version we’re interested in. This should match our local development environments. Note that we can also tell GitHub to cache our pip dependencies here. This will save us a bit of time next time we run this action, as it will not need to download the packages from the internet — instead it will get them from a local cache.

Train model
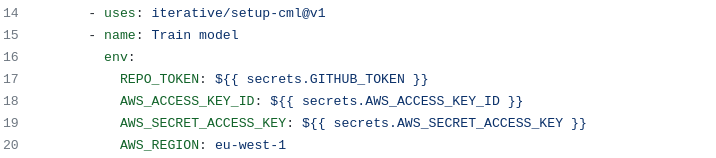
The next step is a big one. We use iterative’s setup-cml action to set up CML so that we can pull and push objects from the remote DVC storage. We also need to pass some credentials to the action. These must be set in the github GUI or using the gh command line tool. We need to pass credentials to an AWS account to grant CML access to the S3 bucket remote storage used by DVC.
Note that you should exercise the principle of least privilege here, and create an AWS account that has a very limited permission set. It’s bad form to use a human user’s credentials here. The REPO_TOKEN is automatically generated and populated by github, so we don’t need to worry about it here. Setting the AWS_REGION is not strictly necessary but it has solved some AWS related issues that I have experienced in the past. Note that in the latest versions of CML we are also able to specify an AWS EC2 instance profile which could also have a limited set of permissions attached.
Next we run the commands we need to run our DVC pipeline. First off we install the pip packages from requirements.txt that are specified in the repo. We use a Makefile to pin the requirements in this file, so we know that we are recreating the exact environment we use on our local machines for development
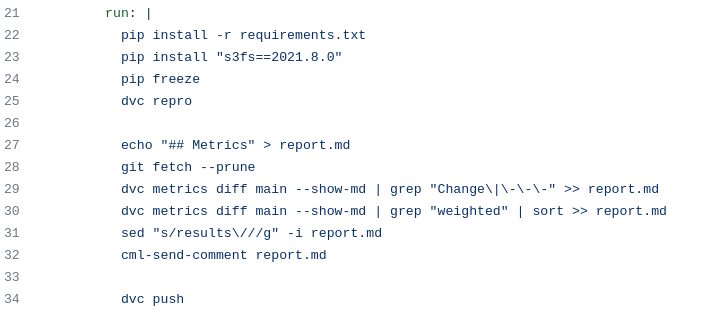
Next we run dvc repro to recreate our pipeline, just as in the previous blog post.
Since we want to report the results of our model run, we can make use of a CML command cml-send-comment which will write the contents of a file to the pull request as a comment. Markdown is read by github in comments, so we can do a bit of formatting like adding ## Metrics to create a second level title.
We also format the dvc metrics by both adding the — show-md flag to format the tables in markdown, and we grep out the parts of the report that we are interested in (line 26 is just the titles, line 27 is just the weighted metrics, line 28 removes the path from filenames).
Finally we push the models and results up to the DVC remote with dvc push.
Commit results
The final step is to add the dvc.lock file to git and commit it using a third party action. Note that we set the pull_strategy to NO-PULL this prevents issues if the instance tries to pull the latest changes before committing the changes it has made.

NOTE: Recent additions to CML mean that you can actually replace this step in the pipeline with a CML native command cml pr.
CML in action
If all goes to plan, you can push a change to a dependency specified in the dvc.yaml, and the CML pipeline will get triggered and a new model trained, and it should look something like this:
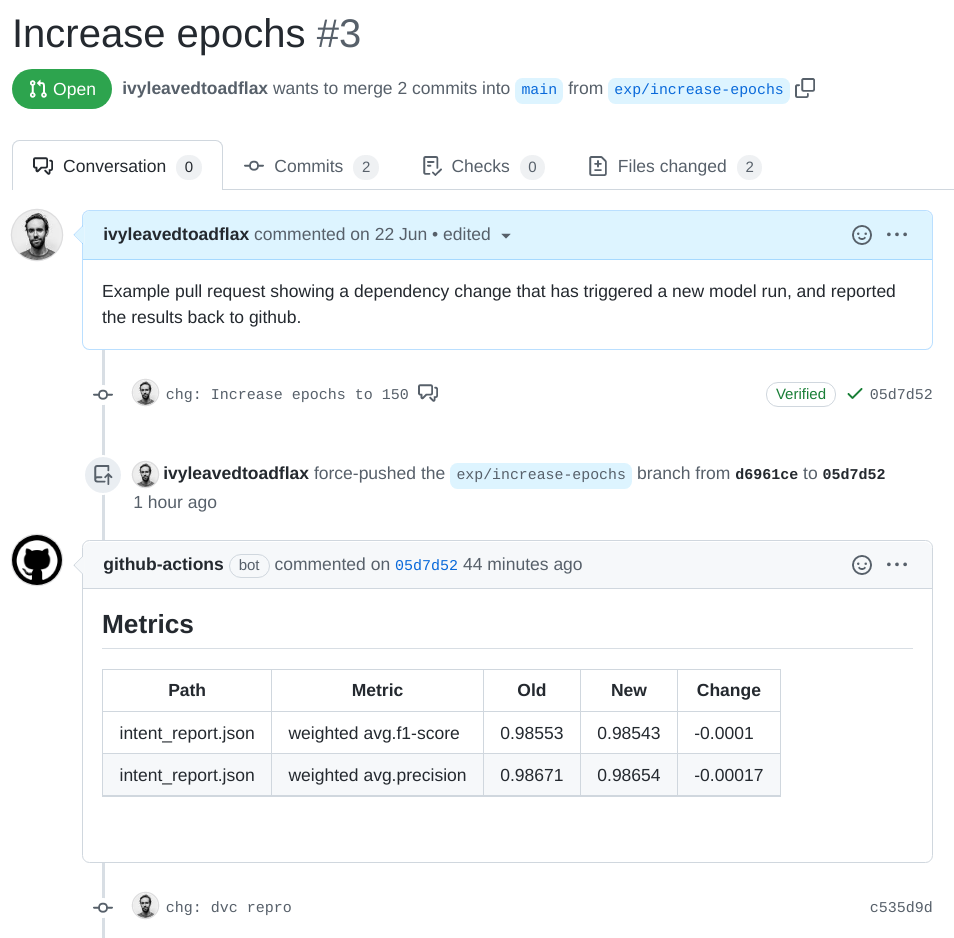
Note that commit c535d9d has been made in my name, even though it was created in the github action. Unlike a real commit from me it does not have a verified tick, as the instance doesn’t have access to my GPG keys (more on this in the GitHub documentation).
If I then want to check out this new model on my local machine I can check out the latest commit on that branch, and then run dvc pull. Like this, we can easily ensure that every NLP engineer working on the project is using the same version of the model, that changes to the source code don’t break the build, and we get a report about the metric changes that result from our changes.
Wrapping it up
There’s a few more things we do to make our Rasa journey even smoother; for instance we have a second GitHub action which automatically deploys the latest version of the Rasa model onto a Rasa X instance once the changes are merged to main.
We could also make use of one of CML’s features to provision a GPU instance on which to train the model. Since CML can also make use of AWS spot instances, our compute costs are some 60% lower than they would be if we ran the load on on-demand instances.
This means that we can use CML to make very cost effective tweaks to model hyperparameters, without needing to sit at a computer: if you have access to the GitHub website you can optimize a model. We can even queue up a number of experimental changes and allow CML to run them all in parallel while we kick back. If this sounds interesting, you should also check out Iterative Studio.
Finally, it’s worth saying that DVC also supports experiments using dvc exp which is worth looking into if you are doing lots of experiments, for example hyperparameter optimization. If you are considering following my example here and running experiments in a GitHub PR, it would be worth your time understanding what is possible with dvc exp.
MLOps for Conversational AI with Rasa, DVC, and CML (Part III) was originally published in MantisNLP on Medium, where people are continuing the conversation by highlighting and responding to this story.