
Prompt Engineering — Part II — How to construct prompts
Categories:
Prompt Engineering — Part II — How to construct prompts
In the last blog we focus on how to interact with Large Language Models (LLMs). In this blog we will talk about prompting, how we construct prompts, and what you have to be careful about when you do it.
Prompt Engineering
A prompt is simply the input text given to an LLM, and is meant to guide the model to generate the desired output.
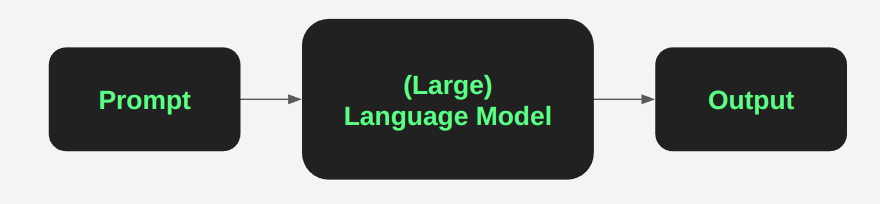
The prompt itself is quite simple in theory, but prompting can be an art form if you’re looking to get as much as possible out of it. We will later see that different prompts can give vastly different results.
The concept of prompt engineering has attracted a lot of attention. I personally think it resembles what we did in feature engineering, meaning you try to find the best way of representing the input to get the best output.
We have explained in the last blog that LLMs are capable of generating very good results for most NLP tasks in a zero or n-shot setup, meaning that they need to see only a few examples of how the “problem” is solved before they are able to do the task. We’ll dig into this in the following sections.
Prompt structure — zero-shot
Let’s first look at a zero-shot prompt structure, and we’ll then move to the complete form with n-shots.
It’s usually a good idea to follow the following schema:
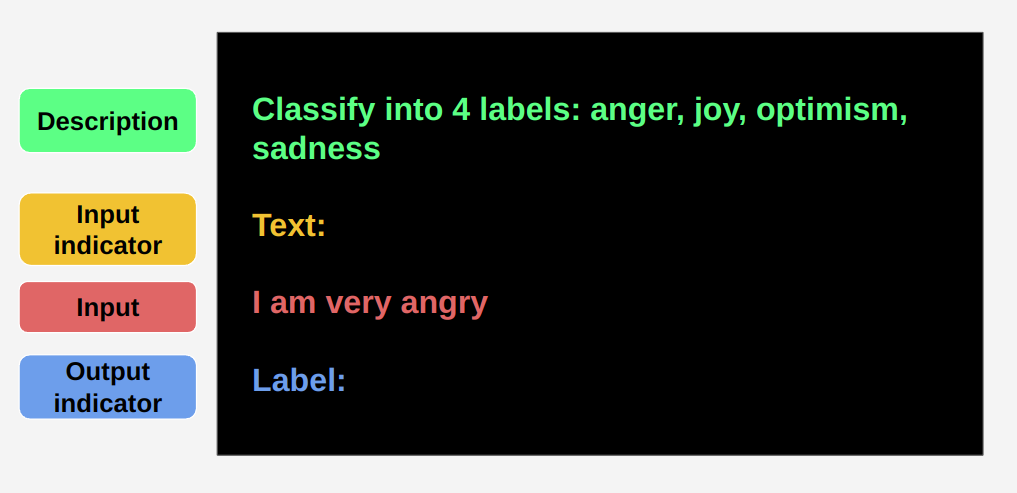
Description
We first describe the task we’re aiming to complete. In the example above, we want to classify a text into one of 4 labels (a simple text-classification problem). So that’s what we tell the model, in natural language: “Classify into 4 labels: anger, joy, optimism, sadness”
It’s important to be as clear as possible about what the task is without making the description too complex. We need to understand that any word we use in the description might trigger something for the model and so we have to be careful with the words used.
That is why we use the terms “classify” and “labels” which are very commonly used terms to describe this kind of task (we could have said “annotate” and “annotations” for example, but these are probably less widely used). Remember, the models have probably seen thousands of datasets for text-classification in some form or another
You can also see that the description is separated from the input with a new line, you should think of that newline character as part of the description (when experimenting you might try something different, maybe multiple newlines, or some special characters, or just a simple space, etc…)
Input indicator
It’s important to have some kind of clear indicator for when the input starts. In this case we use “Text:” followed by a newline.
This can be anything you want (just a special character, or a combination of them), but it’s good to use a meaningful word (or words) here. Better models will be able to make use of that and understand that “hey, this is a text I am getting here”. We’ll see later an example in which just changing the word “text” greatly affects the results for the prompt.
Input
This is just the input itself. In this case it’s an example of a text we’re trying to classify: “I am very angry”. There’s nothing much to be said here except that you should be careful how you separate this from the rest (in this case we just used simple newlines).
Output Indicator
The same way that we indicate when the input starts, we also indicate where the output (result) starts. Think of it as the “=” from an equation (and actually, you can try that for some models).
Again, it’s important what you decide to use here to represent that output start. It will affect how the model understands the entire structure and what you are trying to get from it.
Prompt structure — n-shot
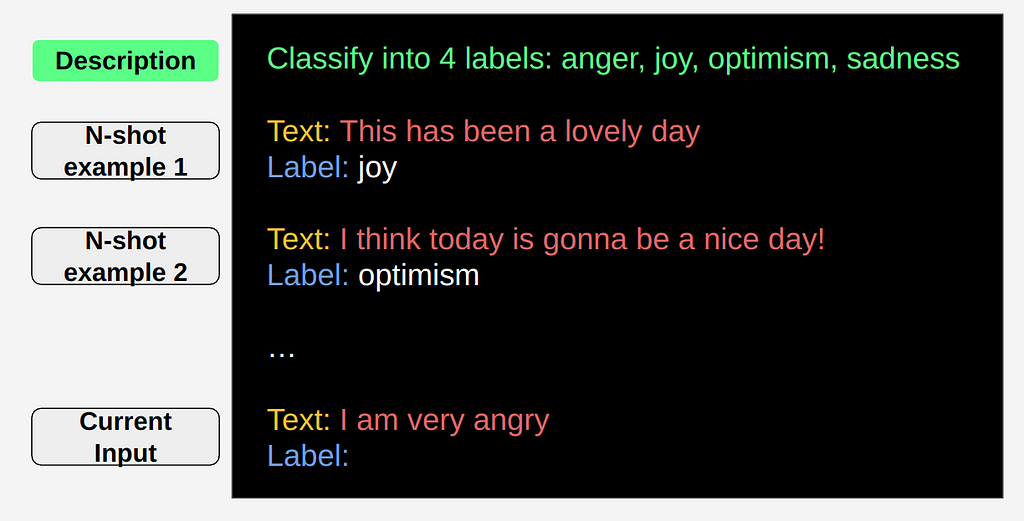
Zero-shot is great, especially because you sometimes don’t have additional data. But it helps a lot for the model to first see a few examples of the “problem” being solved. So as we can see above, that means giving it a few examples while keeping them in the same format.
The only difference is that for the examples we also include the actual output.
The separation between the examples can be important, so it’s another thing you need to be careful of. You need to keep it relatively simple while at the same time trying to make it clear that these are separate examples. Again, in the example we only used newlines (which works well most of the time).
Prompt construction guidelines
A couple of guidelines to help you along the way:
- Try to be clear in the description of the task, don’t over-complicate it from the start. Gradually build the prompt.
- Try to have clear markers separating all sections of the prompt. That might mean simply an additional newline, or maybe some vertical bars (the pipe symbol) or so on.
- Provide diverse examples even when creating an n-shot prompt. . Especially for smaller models, because if for example you have 3 examples that all have the same output, the model might understand that it just needs to generate the same output.
- Try using the most common words to represent a certain concept (we used “classify”, “label”, “text” in the example), and trying more niche variants only after experimenting with the most common ones (for example instead of “text” we could have tried “tweet” as technically these are tweets that we’re classifying).
- Don’t leave trailing spaces. This simply means that you have to make sure your text doesn’t end in a space character, as it messes with the generation of the response. This is especially important as otherwise the performance can significantly degrade in our experience.
- For the expected output, be careful that it’s in a clear format. Use clear words that have meaning behind them. (For example you could use “1, 2, 3, 4” instead of “anger, joy, optimism, sadness”, but it would be less clear)
Generation parameters
The generation parameters can greatly affect the output of a prompt. It doesn’t matter if you’re calling the model through an API or a library, the following parameters are almost always available to be changed and you should take a minute to understand what they do:
Max_tokens
Out of all the parameters, max_tokens can affect the result the most. Too few or too many and you won’t get the desired output. You always have to be careful with this one, and remember that LLMs use sub-word “tokens”, so that a single word may comprise multiple tokens.
For example, in the text-classification problem, we are looking for one label to be returned. But that doesn’t mean we set max_tokens=1
If we do that, we’ll most likely get a space character back, as it’s the first token the model generates based on our n-shot examples.
It also won’t be max_tokens=2. Why? Because this is what we could get as a result: “ sad”. We get “ sad” instead of “ sadness” (which is the correct version) because the word “sadness” is seen as the 2 tokens “sad” and “ness”. Therefore, we’ll use max_length=3
We also won’t use more than 3, because:
1. It generates needless additional tokens (for which you’ll need to pay, if you are using an API)
2. Having a large max_length might affect the generation process and you might actually get a completely different output than the one you want (for example you might get a sentence like “the result is sadness” or so on). When you look at how the generation function works this makes sense.
Top-P & Top-K
For decoding the result, you’ll probably use a combination of Top-K and Top-P either knowingly or not. Have a look here for different methods of generating text and a complete explanation of the concepts.
Setting Top-K is a commonly used strategy to sample from a list of top-k tokens. In each step, we have probabilities/likelihood scores given to each token. We select the top-k of these tokens to forward with.
By setting top-p, we limit the tokens to add up to a certain probability. For example, setting p=0.15, will mean we will be picking tokens from the top ones whose probabilities add up to 15%.
We can combine these two, in which case top-p will act after top-k.
Temperature
The temperature parameter controls the randomness of the response. A lower temperature will increase the likelihood of high probability words and decrease the likelihood of low probability ones. Again referring to the huggingface article for more information. But in general:
- if you want a clear result for a problem (like text-classification or marking a text or QA) use a low temperature (0.1)
- If you want more randomness in your responses (maybe for a chatbot) then use a high temperature
Those are the overall important facts that you need to know regarding prompt engineering.
We now know the basics of constructing prompts. In the next blog we’ll look at some concrete examples and we’ll see exactly how much difference the quality of a prompt can make to the performance of an LLM.
Prompt Engineering — Part II — How to construct prompts was originally published in MantisNLP on Medium, where people are continuing the conversation by highlighting and responding to this story.